Managing design views effectively in Autodesk Revit simplifies workflow and ensures you focus only on the necessary elements. Hiding elements helps simplify complex designs, improve clarity, and maintain focus on specific areas. On the other hand, unhiding allows you to restore essential components when required. This flexibility becomes even more valuable as projects grow in size and complexity.
In this article, you’ll explore different methods for hiding and unhiding elements in Revit. These methods will help maintain a clear, organised, and efficient design environment.
Methods to Hide Elements in Revit

In Autodesk Revit, managing the visibility of elements is an important part of working with your model. Whether you need to hide an object temporarily, simplify a view for better clarity, or refine your design for presentation, controlling visibility helps keep your model organised and accurate.
Revit provides multiple methods to hide elements, each designed for different situations. Below are some techniques to hide elements in Revit:
1. Hide Elements in a View
You can hide elements in a view without affecting other views or the overall model. This is helpful when you need to focus on specific parts of the design or improve clarity. To hide elements, follow these steps:
- Open the view where you want to hide elements.
- Click on View in the top menu and select Visibility/Graphics (or press VG as a shortcut).
- In the Visibility/Graphics dialog, uncheck categories to turn them off or adjust settings based on your needs.
- Select the element you want to hide.
- Right-click and choose Hide in View > Elements. This hides the element in the current view.
2. Hide Elements by Category
If you need to hide all elements of a specific type, like furniture or lighting fixtures, Revit makes it easy to control their visibility within a view.
Simply open the Visibility/Graphics dialog by pressing VG or going to the View menu. Find the category you want to hide, then uncheck its box. This will hide all elements of that category in the current view while keeping them visible in other views.
3. Temporary Hide/Isolate
The Temporary Hide/Isolate feature in Revit allows you to quickly and temporarily change visibility. This feature allows you to hide or isolate elements without permanently changing the view settings.
To hide an element, select it, right-click, and choose Hide in View > Elements. The element will remain hidden until you turn it back on or reset the view.
If you want to focus on specific elements, you can isolate them instead. Select the elements you need, right-click, and choose Isolate in View > Hide Unselected. This will hide everything else and help you work on specific parts of your model without distractions.
4. Using Filters
Filters provide a more advanced way to control what you see in your model. They let you hide or show elements based on specific properties like type, phase, or material. This gives you more precise control over visibility settings. To use filters, follow these steps:
- Open the Visibility/Graphics dialog by pressing VG.
- Go to the Filters tab, click Add, and create a filter based on your required criteria.
- Once the filter is set up, apply it to your view to adjust visibility.
5. Hide by Workset
If you are working on a shared model, you can control visibility using worksets. This is especially helpful in large projects where you need to focus on a specific part of the model.
To hide a workset, press VG to open the Visibility/Graphics dialog. Go to the Worksets tab to turn off the visibility of elements assigned to a specific workset. This helps keep your view clear and organised while working on different sections of the project.
6. Hiding Elements in a Specific View Type
Different view types, such as plans, sections, elevations, and 3D views, have their own visibility rules. For example, some elements may be hidden automatically in a section view based on the view depth or how the view is cut.
To hide elements in these views, you can use the Visibility/Graphics dialog (VG) or the Hide in View option to remove specific elements from sight.
For 3D views, you can also use Visibility/Graphics to control what appears or apply temporary hide/isolate to focus on certain parts of the model without making permanent changes.
7. Using the Visibility/Graphics Overrides
If you want to change how elements look without hiding them, you can use Visibility/Graphics Overrides. This allows you to adjust line style, colour, or transparency to make elements stand out or blend in.
You can do this by opening the Visibility/Graphics dialog (VG) and modifying the appearance settings. Another way is to select an element, right-click, and adjust its properties to change how it looks in the view.
8. Worksets in Workshared Projects
In shared projects, elements are grouped into worksets, which help organise the model. You can control the visibility of these worksets in your view without affecting how other team members see the project. This makes it easy to focus on specific parts of the model while collaborating with others.
9. Visibility of Linked Files
Sometimes, your project may include linked models, like an architectural, structural or MEP-F model. You can control their visibility to keep your view clear and organised.
To hide or adjust a linked model, open the Visibility/Graphics dialog (VG), go to the Revit Links tab, and select the linked model. From there, you can hide it or change its visibility settings based on your needs.
While hiding elements helps simplify your view, there are times when you need to bring them back to ensure accuracy and completeness.
Also read: Discover the Uses of Revit for Architecture, Structural, and MEPF Design.
Using Reveal Hidden Elements Mode to Unhide Elements
In Revit, complex models often have hidden elements to keep views clear and organised. If you need to check hidden components, fix a visibility issue, or make adjustments, you can use Reveal Hidden Elements Mode.
This tool helps you quickly find and unhide hidden elements, whether by accident or on purpose. It ensures you can see the full model when needed, making your workflow smoother and more efficient.
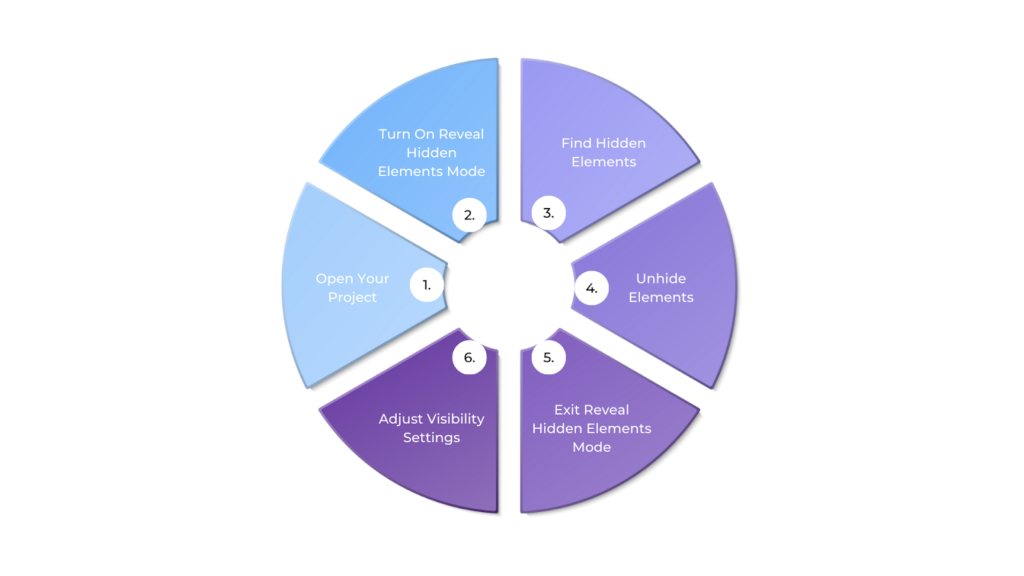
To effectively use the Reveal Hidden Elements Mode in Revit, follow these simple steps to find and manage hidden elements in your project:
- Open Your Project
Start by opening your project in Revit, where you need to find hidden elements.
- Turn On Reveal Hidden Elements Mode
Go to the View tab in the top menu. In the Visibility panel, click the Reveal Hidden Elements button (lightbulb icon). Your view will change, showing hidden elements in a colour-coded format.
- Find Hidden Elements
When the mode is active, hidden elements will appear, usually highlighted in magenta. These could be walls, doors, furniture, annotations, or other components that are not visible in your current view.
- Unhide Elements
Select the hidden element you want to restore. Right-click and choose Unhide in View, then select:
- By Category: Reveals all hidden elements of the same type.
- By Element: Only the specific element you selected will be revealed.
- Exit Reveal Hidden Elements Mode
When you’re done, click the Reveal Hidden Elements button again to return to the normal view. The previously hidden elements will now be visible.
- Adjust Visibility Settings (Optional)
For more control, open Visibility/Graphics (VG shortcut) to adjust visibility at a category or element level as needed.
Ready to simplify your workflow and improve visibility?
BIM ASSOCIATES is your one-stop BIM Solution provider for Revit Architectural and Structural Solutions. They coordinate with your team to develop, record, and streamline the BIM Revit Model, along with the sheets, Bill of Quantities, Bill of Materials, and clash coordination.
While Reveal Hidden Elements Mode is a powerful way to find and restore hidden components, it’s not the only method available. Depending on why an element is hidden, you may need to explore other options to bring it back into view.
Other Ways to Unhide Elements in Revit
There are several other ways to unhide elements in Revit, depending on how they are hidden. Whether an element was manually hidden, affected by a view setting, or controlled by filters, you can restore visibility using the right method.
Some effective ways to unhide elements in Revit:
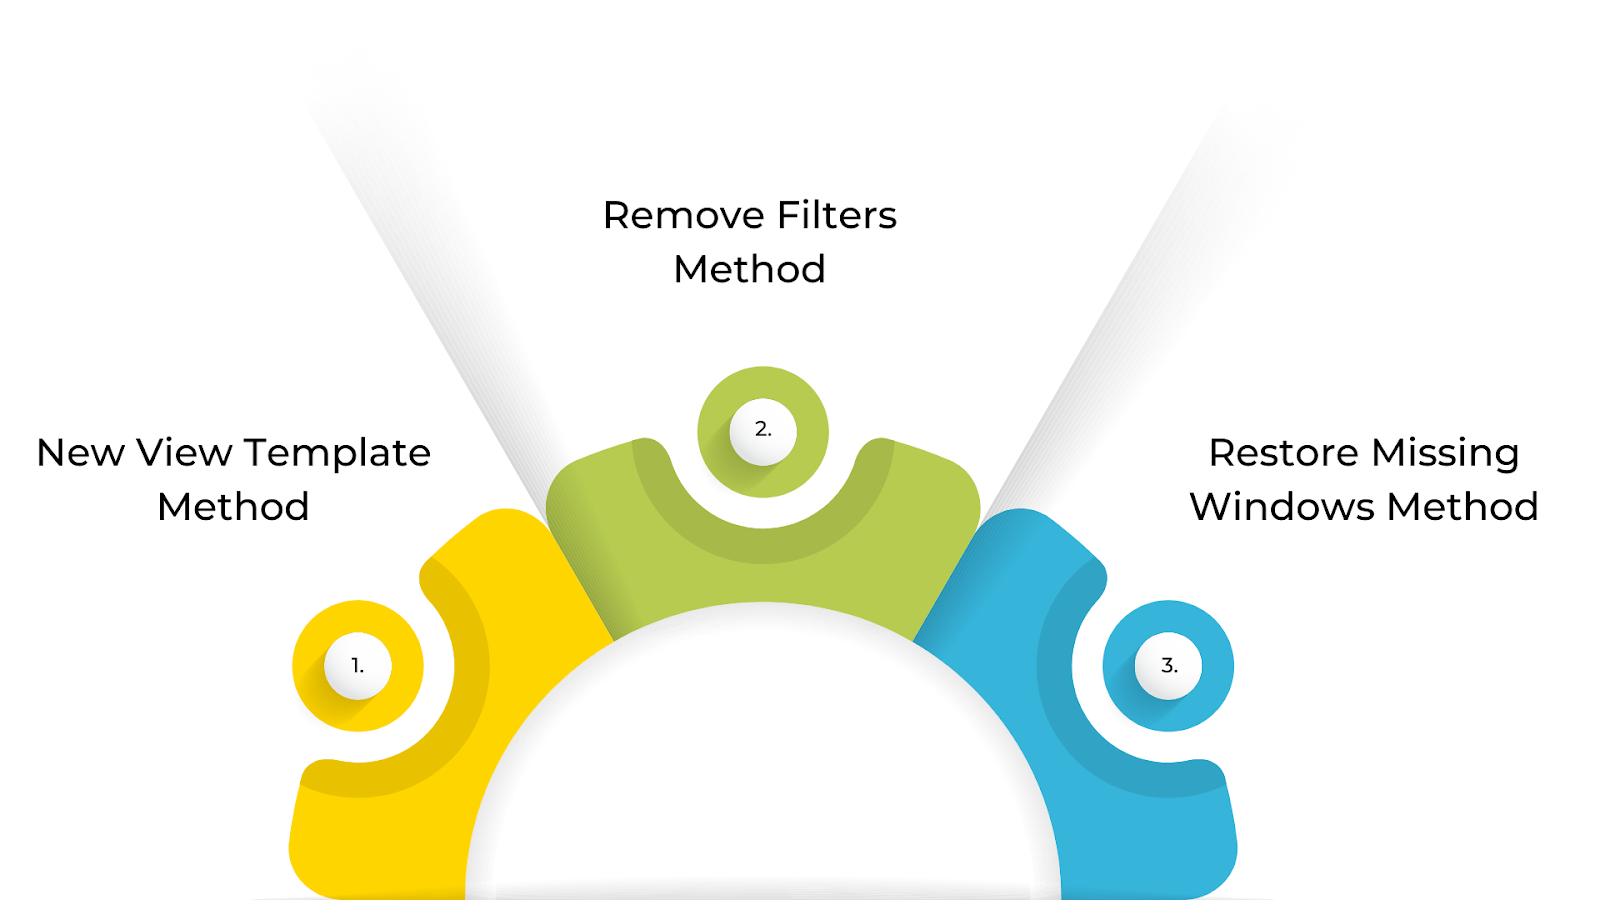
1. New View Template Method
If visibility issues persist, applying a new view template can reset the view settings, ensuring all elements are displayed correctly. This is helpful when elements are hidden due to an applied template or custom settings. To unhide elements in Revit using the New View Template Method, follow these steps:
- In the Project Browser, right-click on the view title you want to use.
- Click Create View Template From View.
- Give the template a name and click OK.
- Right-click on the old view title, go to the Duplicate View menu and click Duplicate.
- Right-click the duplicate view in the Names panel and select Apply View Template.
- Choose the new view template and click OK.
Rebuilding the view is helpful if you work on a large project with many linked files and elements. It ensures better organisation without affecting performance.
The main benefit is that you won’t have to manually go through each hidden element or category. Instead, you start fresh and only show the needed elements, saving time and effort.
2. Remove Filters Method
Sometimes, elements are hidden because of view filters applied in the Visibility/Graphics settings. Removing or adjusting these filters can bring back missing elements without affecting other visibility settings. To unhide elements in Revit using the Remove Filters Method, follow these steps:
- Go to the View tab.
- In the Graphics panel, click Visibility/Graphics (Shortcut: VG).
- In the pop-up window, go through the tabs and check all categories.
- Click OK to apply the changes.
The last tab in the Visibility/Graphics window is the Filters tab. Open it to see if any filters are affecting the view. If you find a filter that might be hiding elements, uncheck the box under Enable Filter and click Apply to disable it.
3. Restore Missing Windows Method
If key interface elements, like the Properties or Project Browser windows, are missing, they can be restored through the View tab. This ensures you have full access to essential tools for managing your project. To unhide elements in Revit using the Restore Missing Windows Method, follow these steps:
- Go to the View tab.
- In the Windows panel, open the User Interface drop-down menu.
- Check the box for the missing window to restore it.
To reset changes made to the User Interface, delete the UIState.dat file from C:\Users\Username\AppData\Roaming\Autodesk\Revit\Autodesk Revit 20XX\ENU and restart Revit. This will restore the Ribbon to its default settings.
The Project Browser can also help locate missing families and components in your model. After these steps, all hidden elements and tools in your user interface should now be visible.
BIM Supports GREEN EARTH.

Conclusion
Knowing how to hide and unhide elements in Revit is important for keeping your model clear, organised, and easy to work with. It helps you focus on specific parts of your design, fix missing elements, and create better presentations.
To improve your skills, explore online tutorials, Autodesk forums, and training courses. The more you practice, the easier it will be to manage complex models.
Are you looking for BIM solutions?
BIM ASSOCIATES is your one-stop BIM Solution provider for the Architecture and Structure discipline. Their solutions help clients with better decision-making, cost-saving, efficient construction planning, and green earth initiatives.
You might also like: Exporting Revit to 3ds Max through DWG, FBX, and RVT Methods.
FAQs (Frequently Asked Questions)
1. How do I show hidden section boxes in Revit?
Open the Visibility/Graphics Overrides window (Shortcut: VG), go to the Annotation Categories tab, and check or uncheck the Section Boxes category to show or hide them.
2. How do I show all hidden objects in Revit?
Select the lightbulb icon at the bottom of the screen to activate Reveal Hidden Elements Mode. Hidden objects will appear in pink. Select the object, right-click, and choose Unhide in View.
3. Where are visibility settings in Revit?
To change an element’s visibility, right-click it in the drawing area and use the options in the menu. For quick view settings, use the View Control Bar at the bottom of the view window, just above the status bar.