
In 2025, the UK stands as one of the leading adopters of Autodesk Revit for BIM and architectural design, with 996 users making up 10.22% of the global customer base. As Revit usage grows, ensuring consistency and efficiency across projects becomes even more critical.
One way to achieve this is by creating and saving view templates in Revit. These templates standardise views, annotations, and visibility, allowing teams to work more efficiently while maintaining design uniformity. Custom view templates simplify the design process, save time, and ensure consistency throughout the project lifecycle.
This article will walk you through the process of creating view templates in Revit, providing practical tips on adapting them to your needs and saving both view and schedule templates for future use.
What are View Templates in Revit?

View templates in Revit are preset settings that control how views look and behave in a project. They help keep floor plans, sections, elevations, and 3D views consistent by defining visibility, graphic overrides, detail levels, and annotations. These templates can also include settings for line weights, colors, fonts, and other visual elements.
View templates are essential for maintaining design standards, improving efficiency, and ensuring all team members work with the same view settings. To make the most of view templates in Revit, it’s important to understand how to create them effectively.
Creating View Templates in Revit
Creating view templates in Revit is an effective way to standardise and simplify your project’s visual presentation. These templates let you apply preset settings to multiple views, ensuring uniform visibility, graphics, and styles.
With Revit’s View Template feature, you can define a set of settings and apply them across multiple views at once. This ensures all views and sheets follow the same standards, improving efficiency and clarity.
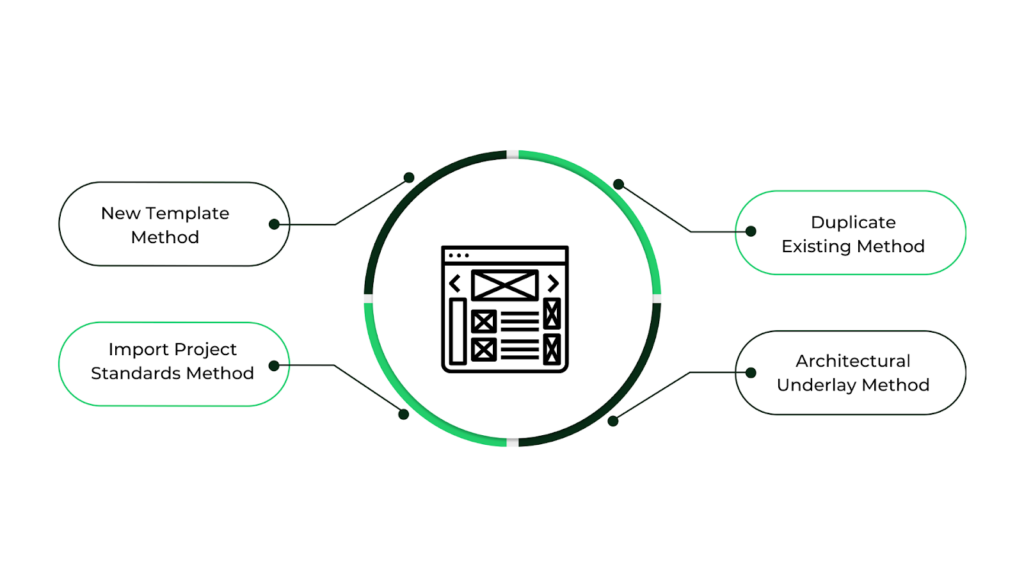
Creating view templates in Revit involves several methods that include:
New Template Method
The New Template method in Revit is a simple way to create view templates from scratch without using an existing view. It helps you set up standard view settings that can be applied to different views in a project, ensuring consistency and efficiency.
To create view templates in Revit using the New Template method, follow these steps:
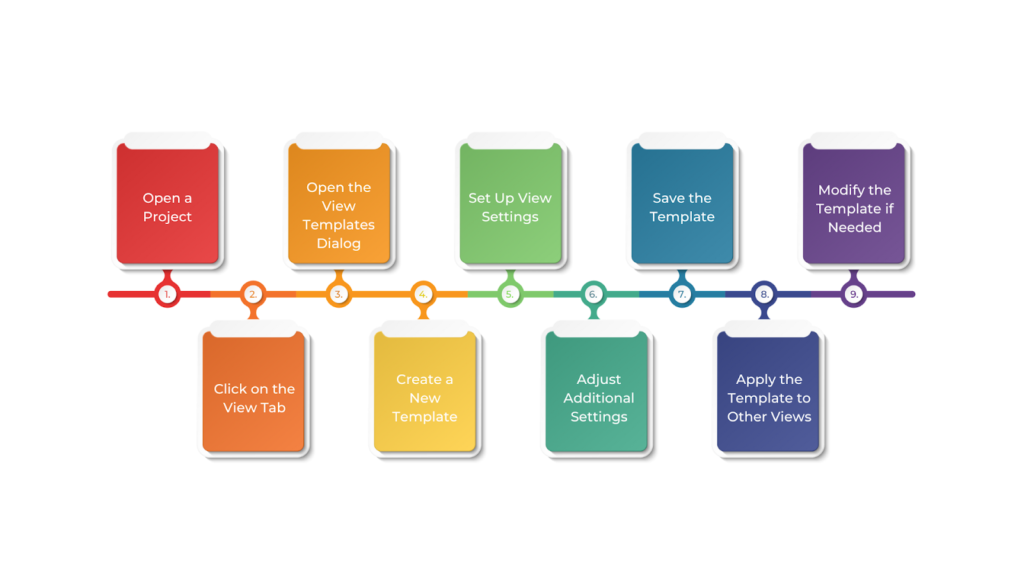
- Open a Project
Start by opening a new or existing Revit project where you want to create and use the view template.
- Click on the View Tab
Go to the View tab in the top menu bar. This is where you’ll find tools for managing views, including the option to create a view template.
- Open the View Templates Dialog
Click the View Templates drop-down menu in the Graphics panel and select Create Template from Current View.
- Create a New Template
Instead of using an existing view, create a new template from scratch. In the View Templates dialog box, click New. Name your template clearly based on its purpose, such as Floor Plan Template or Elevation Template.
- Set Up View Settings
Customise the view settings to define how your template will control different views, such as:
- Visibility/Graphics: Choose which elements (walls, doors, furniture, etc.) will be visible.
- Detail Level: Set it to Coarse, Medium, or Fine, depending on the required detail.
- View Filters: Apply filters to control visibility or add colour overrides to specific elements.
- Graphics Overrides: Adjust colors, line patterns, and transparency for various elements.
- View Range: Set the cut plane and visibility range for elements in the view.
- Adjust Additional Settings
You can also fine-tune additional settings to control the appearance and organisation of your views. To achieve this, you can adjust key settings such as:
- View Scale: Set the scale for the view display.
- Annotation Visibility: Choose which annotations (dimensions, tags, etc.) should be visible.
- Crop Region: Enable or disable the crop boundary for the view.
- Save the Template
After setting everything up, click OK to save the template. It will appear in the list of available view templates.
- Apply the Template to Other Views
To use the new view template, open the View Properties of any view. Under View Template, select the newly created template from the drop-down list. The view will now update to match the template’s settings.
- Modify the Template if Needed
If you need to make changes later, go to Manage > View Templates. Select the template, make the necessary edits, and save. Any updates will automatically apply to all views using that template.
In addition, you can use temporary view properties to test graphics and visibility settings without changing the original view. Click Temporary View Properties on the View Options bar, then enable it. Select Temporarily Apply Template Properties to apply a template that stays active until you turn it off.
Following these steps allows you to create and manage view templates efficiently, ensuring consistency and saving time throughout your project.
Duplicate Existing Method

The Duplicate Existing method in Revit allows you to create a view template by copying the settings from an existing view. This is a quick and efficient way to standardise views, especially if you already have a view that meets your project’s needs.
Instead of setting everything up from scratch, you can apply the same settings to other views with ease. To create view templates in Revit, follow these steps:
- Select the Existing View
Choose a view that already has the settings you want to duplicate. This could be a floor plan, elevation, section, or any other view with the right visibility, graphics, and annotation settings.
- Open the View Templates Dialog
Go to the View tab in the top menu. In the Graphics panel, click View Templates, then select Create Template from Current View.
- Duplicate the Existing Template
Click Duplicate in the View Templates dialog box to create a new template based on the selected view. Give the template a clear name, such as “Floor Plan Template” or “Elevation Template,” to identify its purpose.
- Modify the Template (Optional)
If needed, adjust the template settings, such as visibility options, detail levels, view range, or graphic overrides, to fit different project requirements.
- Save the Template
Once you’ve made the necessary changes, click OK to save the new template. It will now be available for use throughout the project.
Import Project Standards Method
The Import Project Standards method in Revit allows you to bring view template settings from another project into your current one. This is a great way to maintain consistency across multiple projects without recreating templates from scratch. This method benefits firms that follow standard design practices across different projects.
To create view templates in Revit using the Import Project Standards method, follow these steps:
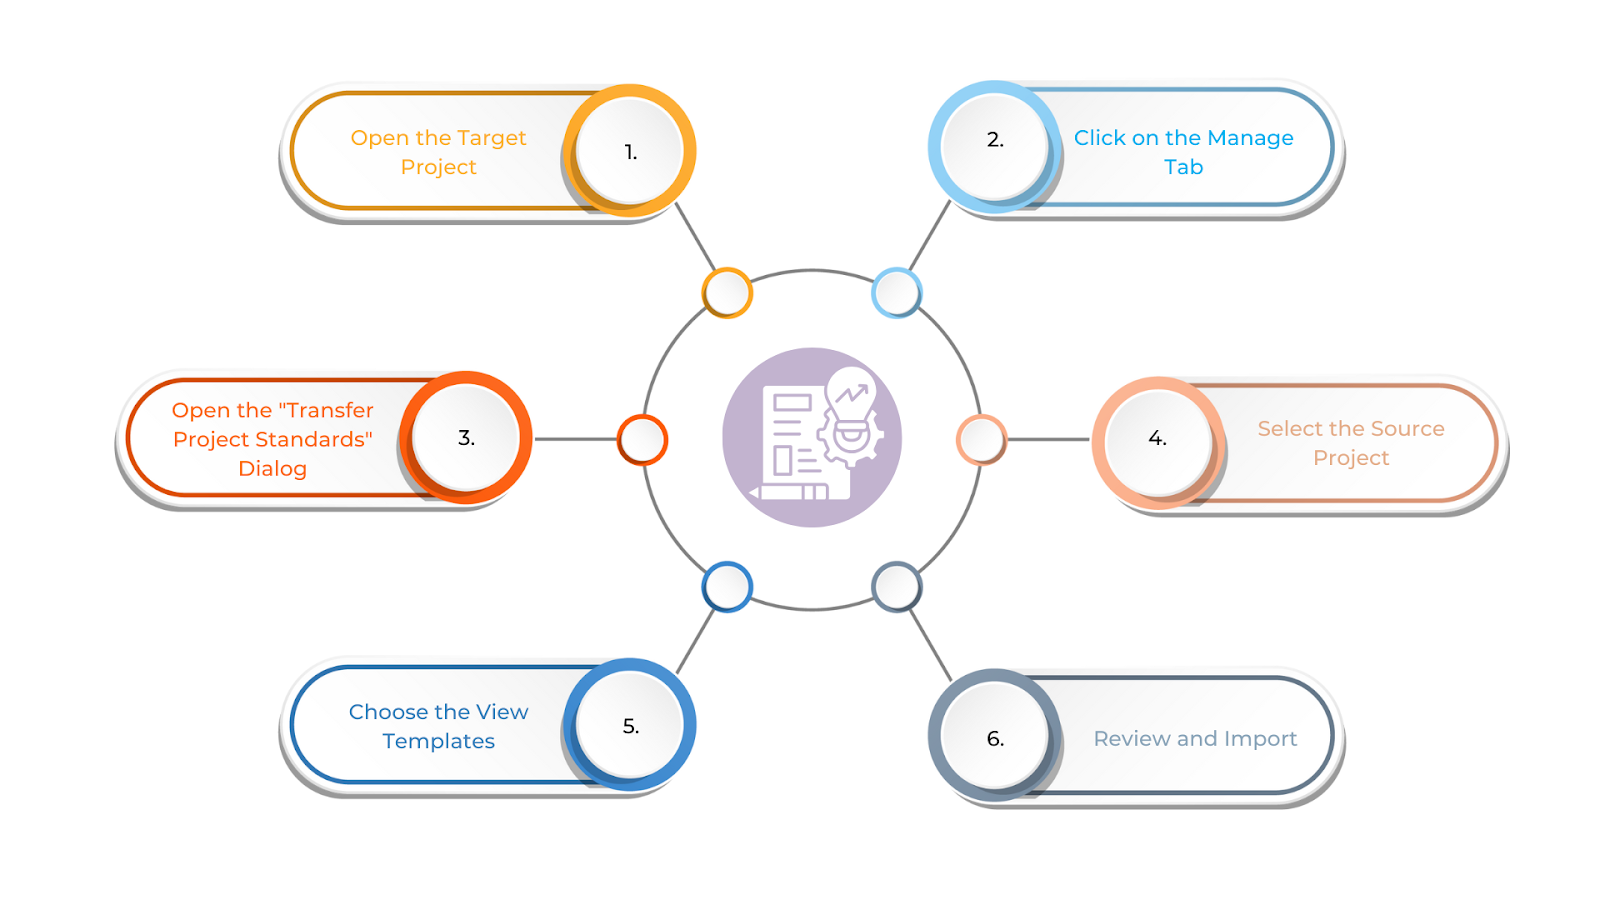
- Open the Target Project
Start by opening the Revit project into which you want to import the view template. This can be a new or existing project to which you need to apply templates from another project.
- Click on the Manage Tab
Go to the Manage tab in the top menu bar. This is where you’ll find tools for importing and managing project settings.
- Open the “Transfer Project Standards” Dialog
In the Manage tab, locate the Settings panel and click Transfer Project Standards. This tool lets you import various settings, including view templates, from another project.
- Select the Source Project
In the Transfer Project Standards dialog box, click Select New Project and choose the project that contains the view templates you want to import.
- Choose the View Templates
After selecting the source project, a list of available project standards will appear. Look for View Templates in the category list and select the ones you want to import. You can choose specific templates or import all view templates from the source project.
- Review and Import
Once you’ve made your selection, click OK to begin the import. The selected view templates will be copied into your current project.
If there are any conflicts or duplicate templates, Revit will notify you and prompt you to resolve them. To copy multiple view templates across different projects more efficiently, consider using PyRevit. This tool allows you to transfer templates in batches, saving time and effort.
To transfer templates, follow these steps:
- Open all the projects where you want to apply the templates.
- Go to the PyRevit tab and open the Views menu.
- Click Copy selected view templates to other open models.
- Choose the templates you want to transfer and click Select.
- Pick the destination projects.
- Click OK to complete the transfer.
This method ensures all your project files maintain a consistent look and settings.
Architectural Underlay Method

The Architectural Underlay method in Revit helps you use architectural elements from other views or levels as a background to guide your design. This approach ensures that key details, like floor plans, structural elements, or elevations, stay visible while you work. To create view templates in Revit, follow these steps:
- Open a Structural Plan View: In the Project Browser, under Structural Plans, double-click on a Plan View to open it.
- Set the Scale: Choose the appropriate scale for the Structural Plans in the View Control Bar.
- Adjust the Detail Level: Change the Detail Level to Medium in the View Control Bar to better visualise structural elements.
- Change the Visual Style: In the View Control Bar, set the Visual Style to Hidden Line for a clearer representation of structural components.
- Create a View Template: In the Project Browser, right-click on the active Plan View and select Create View Template From View.
- Name the View Template: Enter a descriptive name for the new View Template, then click OK.
- Adjust Visibility Settings: Set the Discipline to Coordination to display Architectural Walls and other architectural elements. Click Edit… under V/G Overrides RVT Links to modify visibility settings.
- Enable Underlay and Halftone: Check the Halftone box to display linked elements with a faded appearance, making them easier to distinguish. Then, check the Underlay box to improve the visibility of underlying elements. Click Apply, then select OK to confirm and save the changes.
- Save the View Template: Click OK to finalise the template settings.
- Select Additional Plan Views: In the Project Browser, hold the Ctrl key and select the remaining Plan Views where you want to apply the template.
- Apply the View Template: In the Properties Palette, click on View Template.
- Assign the New View Template: Select the newly created View Template, click Apply, then click OK to apply the settings across selected views.
Applying a view template ensures consistency across multiple views, making project management more efficient. But beyond view templates, setting up a well-structured Revit template can further simplify your workflow and improve productivity.
Also read: Exporting Revit to 3ds Max through DWG, FBX, and RVT Methods.
Tips on Creating A Revit Template
Creating a Revit template is key to keeping your projects organised, consistent, and efficient right from the start. A well-structured template simplifies the design process, ensures your team follows company standards, and saves time on future projects by giving you a strong foundation to build.
Below are some essential tips for creating an effective Revit template:
Naming Conventions
A clear naming system keeps your Revit template organised and easy to navigate. Use consistent prefixes like “A-“ for architectural or “S-“ for structural elements. Descriptive names for families, sheets, and views help the team quickly find and manage components.
Families
Preload essential families such as doors, windows, furniture, and plumbing fixtures to save time on new projects. Organise them logically within the template or link them externally and regularly update families to meet project needs.
Project Browser Organisation
Group views, sheets, and families into clear categories, such as floor plans, elevations, and sections. Label sheet sizes and views properly for quick access, which allows you to work more efficiently.
View Templates
Standardise views with predefined settings for visibility, detail levels, and line weights. Set up templates for floor plans, elevations, sections, and 3D views to maintain consistency and reduce manual adjustments.
Starting View
Choose a helpful starting view, such as a key plan or title sheet, to provide a clear project overview. Include essential references like grids and levels to help users begin modelling efficiently.
After setting up your template with all the essential elements, the final step is to save it correctly so that you can reuse it for future projects.
Ready to simplify your projects and achieve these benefits?
BIM ASSOCIATES is your one-stop BIM Solution provider for Revit Architectural and Structural Solutions. They coordinate with your team to develop, record, and streamline the BIM Revit Model, along with the sheets, Bill of Quantities, Bill of Materials, and clash coordination.
How to Save a Revit Template?

Saving a Revit template lets you keep important project settings, families, and views ready for future use. It helps maintain consistency across projects, simplifies workflow, and saves time by reducing repetitive tasks.
A template stores preset settings like view templates, project units, families, and sheet setups, so every new project starts with the right structure. To save a Revit template, follow these steps:
- Prepare Your Project
Before saving a template, set up your project with standard settings to ensure efficiency and consistency in future projects. Standard settings include:
- Define units (metric or imperial).
- Create levels and grids as reference points.
- Organise views (floor plans, sections, elevations).
- Preload essential families like doors, windows, and furniture.
- Set up view templates for consistency.
- Go to Save As
Click the File tab, choose Save As, and select Template from the options.
- Name Your Template
To organise your files, enter a clear, descriptive name like “Architectural Template” or “Structural Template.”
- Select a Save Location
Choose a central, accessible location for your team. The file will be saved with a .rte extension (Revit Template File).
- Set Template Options
Decide whether to include project-specific details (name, address). Choose whether to embed families and groups. Review your selections to ensure all necessary elements are included.
- Save the Template
Click OK to save your template. It’s now ready to be used as a starting point for future projects.
Once you save your Revit template, you have a strong starting point for future projects, keeping everything consistent and efficient. You can also save schedules as templates to ensure uniform formatting and organised data across multiple projects.
How To Save A Revit Schedule As A Template?
Saving a Revit schedule as a template helps maintain consistency and saves time on future projects. Schedules, like those for doors, windows, materials, or quantities, often have specific fields, filters, and formatting. By saving them as templates, you can reuse the same setup in different projects without having to recreate everything from scratch.
Below is a step-by-step approach to saving a Revit schedule as a template:
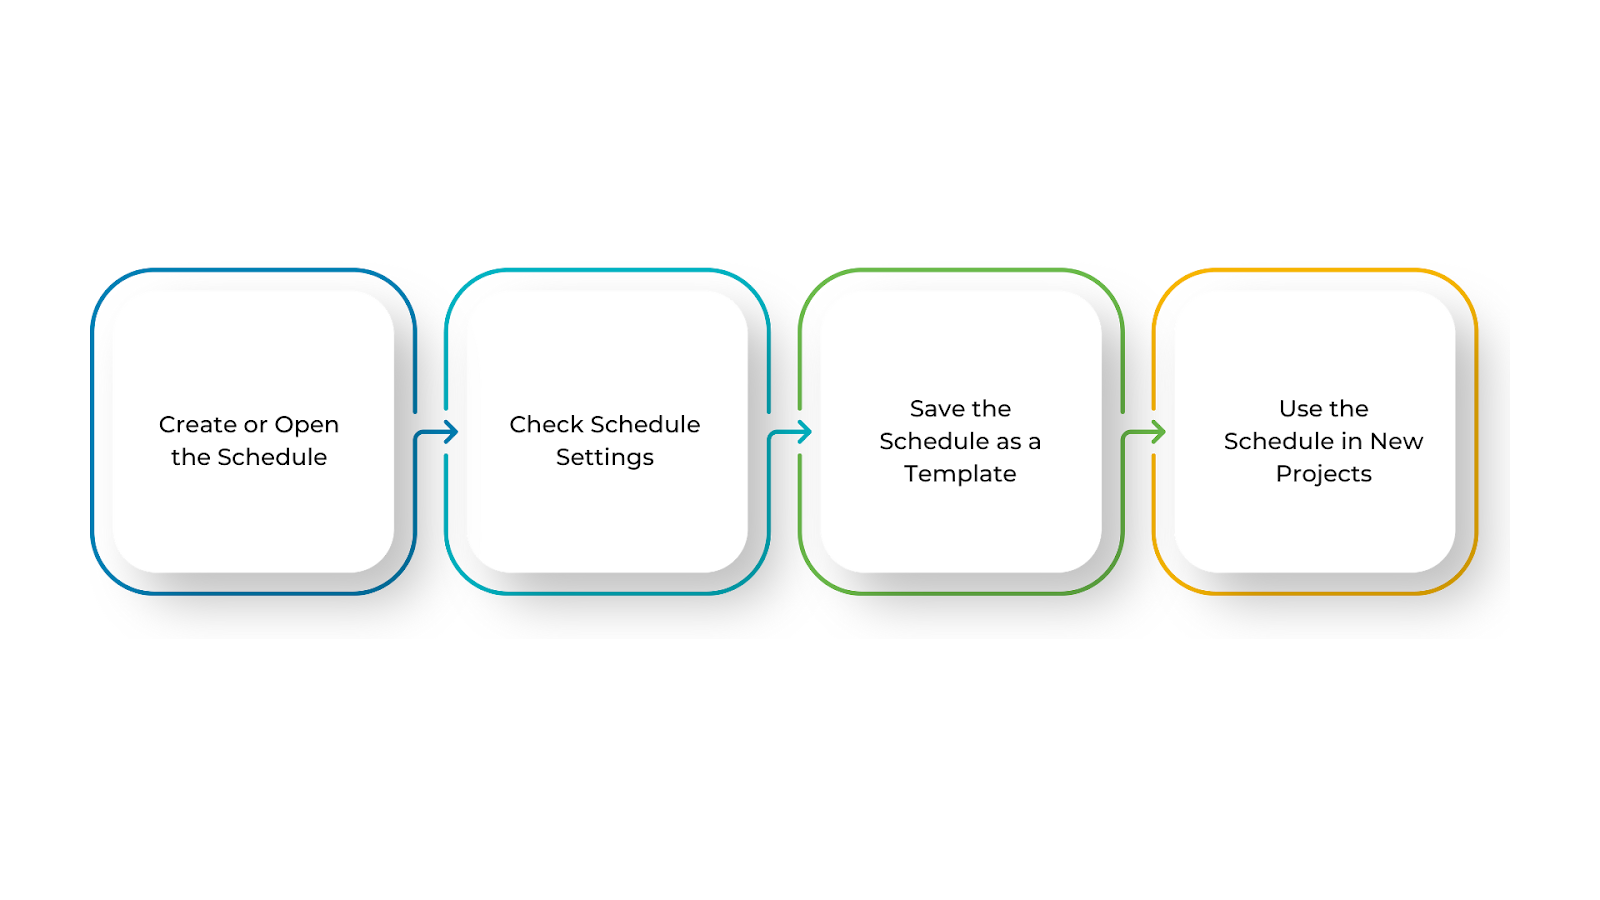
- Create or Open the Schedule
Start by creating a new schedule or opening an existing one you want to save as a template. This could be a schedule for doors, windows, rooms, or quantities. Ensure it includes all necessary fields, filters, sorting, and formatting.
- Check Schedule Settings
Before saving, review these key settings to ensure accuracy and consistency in your schedule:
- Fields: Ensure all required data is included (e.g., Door Number, Type, Area).
- Filters: Apply any necessary filters, like showing only specific sizes.
- Sorting/Grouping: Organise the schedule for clear readability.
- Formatting: Adjust text style, column widths, and other visual settings.
- Save the Schedule as a Template
To save the schedule, select Save As from the File tab. Choose Project, then save the file as a Revit Project (.rvt). In the Project Browser, right-click on the schedule, select Save View Template, and name and save the template for future use.
- Use the Schedule in New Projects
To apply the saved schedule to a new project, open the new project. Go to the View tab and click Schedules > Schedule/Quantities. In the New Schedule dialog, select Load Template and browse for your saved template file. Click Open, and the schedule will be imported with its settings intact.
BIM Supports GREEN EARTH.

Conclusion
Creating and saving view templates in Revit is a simple yet powerful way to keep your projects organised and consistent. By defining standard settings, annotations, and visibility preferences, you establish a strong foundation for new projects. Saving schedules as templates further simplifies the setup process and reduces manual work.
With view templates, you save time, maintain uniformity across project views, and improve team collaboration. Integrating them into your workflow allows you to focus more on design and less on repetitive setup tasks, ultimately improving both efficiency and project quality.
Are you looking for BIM solutions?
BIM ASSOCIATES is your one-stop BIM Solution provider for the Architecture and Structure discipline. Their solutions help clients with better decision-making, cost-saving, efficient construction planning, and green earth initiatives.
You might also like: Revit Tutorial: Elevation Views, Levels, and Spot Elevations Guide.
FAQs (Frequently Asked Questions)
1. How do you save a viewport in Revit?
Right-click the view name in the Project Browser, then select Save to New File. Enter a name for the new file. This creates a separate Revit project file that contains only the selected view and its contents.
2. Where are Revit files saved?
For non-workshared models, Revit files are saved to a location chosen by the user, typically on the hard drive. Backup copies are automatically created in the same folder.
3. Where are Revit templates stored?
By default, Revit templates are stored in C:\ProgramData\Autodesk\RVT ####\Templates (where #### is the Revit version). To see the ProgramData folder, enable Hidden Items in File Explorer. If the folder doesn’t exist, you can manually create the path in Windows Explorer.